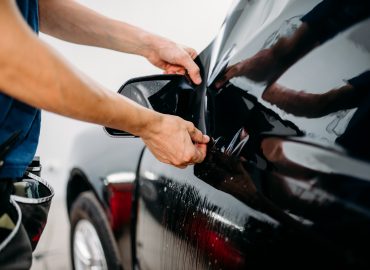
Window tinting is a stylish addition to your vehicle or home. It also offers several practical benefits like privacy, heat reduction, and glare reduction. Installing window tinting by you can be rewarding and cost-effective. With our step-by-step guide on DIY window tinting, you’ll gain the skills and knowledge to achieve a flawless tint job on your own. However, you can always seek professional help from Auto Boss Vaughan regarding installing window tinting. DIY window tinting can be a cost-effective way to enhance your vehicle’s appearance while ensuring that you stay within the legal window tint limits.
Tools and Materials You’ll Need
Gather the material and tools before you start the process:
- Window tint film
- Spray bottle filled with soapy water
- Squeegee
- Heat gun or hair dryer
- Utility knife with fresh blades
- Microfiber cloth
- Cleaning solution
- Lint-free cloth
- Cutting mat
- Measuring tape
- Masking tape
Step by Step Guide to Window Tinting
Auto Boss Vaughan’s comprehensive guide will take you through installing window tinting on your vehicle or window. Following these steps ensures a successful DIY project.
Step 1: Preparing the Surface
The first step is to prepare the surface that you’ll be tinting. The surface should be clean whether you are applying tinting on a car or a home window. Use a cleaning solution to clean the window thoroughly. Spread the solution evenly over the surface. Wipe it off with a microfiber or lint-free cloth to ensure no streaks or residue. Use the two-bucket method to make the surface free from dirt and debris. Dry the surface to avoid dust gaining on the surface. The dirty surfaces make the installation process not work.
Step 2: Measuring and Cutting the Tint Film
Measuring the window dimensions is the second step when you’re tinting. Use a measuring tape for this step. Add an extra inch to each side for a margin of error. Lay the tint film on a cutting mat with the protective liner facing up. Use a sharp utility knife to cut the tint film according to the measured dimensions. Follow the lines on the cutting mat for straight cuts.
Step 3: Creating a Template
If you’re working with a curved or intricate window shape,
Create a template using masking tape on a flat surface.
Lay the cut film on the tape.
Trace it around its edges.
Cut out the template.
Test it on the window to ensure it fits accurately.
Remember to take this measurement accurately; a slightly large or small portion can waste your tinting film.
Step 4: Applying Soapy Water
Pour the solution of water and dishwashing mixture into a spray bottle. Spray this solution thoroughly outside of the window. It creates a smooth surface that allows you to adjust the film during installation. Remember not to spray too much of the solution as it can create the surface slippery
Step 5: Applying the Tint Film
Apply the tinting film step by step, following the guidelines:
- Peel off a small portion of the protective liner from the tint film
- Position the exposed adhesive side against the wet glass
- Align it with the edges
- As you gradually peel off more of the liner
- Use the soapy water to keep the adhesive side wet. It prevents the film from sticking prematurely and allows you to adjust its position. Although soapy water is necessary to keep the glass and tint wet, too much soapy water will not allow the tint to get installed properly.
Step 6: Squeegee the Film
After placing the tint film:
- Use a squeegee to gently push out any air bubbles or excess water from beneath.
- Start from the center and work outward.
- Use an even and firm pressure on every part of the film.
It is a crucial step that ensures a smooth and bubble-free installation.
Step 7: Trimming the Excess Film
Trim the excessive window tinting with a sharp utility knife along the window edges. Follow the contours of the glass carefully. You must ensure that the film fits within the window frame.
Step 8: Heating and Final Adjustment
If you observe stubborn air bubbles, use a low-setting hair dryer or heat gun to warm the film slightly. Gently massage the area with your fingers or use the squeegee to press out the imperfections.
Step 9: Drying Process
Let the window tint film dry for at least 24-48 hours. Avoid rolling down car windows or applying any pressure to the film. It ensures that the adhesive fully sets and the film adheres properly.
Maintenance Tips for Longevity
Clean the tinted windows with a mild, ammonia-free cleaning solution and a microfiber cloth.
Avoid using high-pH materials that could scratch the film.
Refrain from rolling down car windows aggressively, especially during the initial curing period.
Regularly inspect the tint for any signs of peeling or damage and address issues promptly. Avoid washing window tinting film before curing. Once it is cured, maintain it regularly.
Conclusion
In conclusion, undertaking DIY window tinting can be a rewarding endeavor, offering both cost savings and a sense of accomplishment as you transform your windows with precision and style. Installing window tinting yourself is a rewarding project that can enhance your vehicle’s or living space’s aesthetics and functionality. Professional results are achieved with the right tools, careful preparation, and attention to detail. Keep going even if your first attempt isn’t flawless. As you gain experience, you’ll become more proficient in creating seamless, visually appealing window tint installations that provide comfort and style. Many people opt for DIY window tinting, but for a professional finish and convenience, consider mobile window tinting services.
FAQs
Is window tinting a legal option?
Yes! Window tinting is legal. However, the laws and regulations regarding window tinting change according to the region.
Is window tinting film self-adhesive?
The window tint has an adhesive layer protected by a clear liner. You will remove the liner, wet the adhesive, and squeeze the film on the glass.
How does tinting window glass work?
The companies use a thin electrochromic material film to prevent the light from entering. You may control them and change their brightness.
Can you install window tinting film with soapy water?
Yes! Wet the window with soapy water and install the film on it. Glass wetting makes the film attach to the glass easily.
Which is the easiest tint to install?
Motoshield Pro premium precut ceramic kit is easy to install.